All power to the hosts
And that’s how it works:
1. installation
Just type the following command on the console of orcharhino:
foreman-installer --enable-foreman-plugin-discovery --foreman-plugin-discovery-install-images=true
This installs the Discovery Plugin and the Discovery Image. The hosts have to boot this to access the plugin in orcharhino.
For a new installation of orcharhino Version 3.6 or higher the plugin can be easily installed using the orcharhino-installer.
2. configuration
After installation, two new pages are available on the management interface:
- Discovered Hosts in the „Hosts“ menu shows the found hosts
- Discovery Rules in “Configure” menu manages the rules for automatic configuration of found hosts
And a new tab in the settings called Discovered.
To see results as quickly as possible, you create a Discovery Rule.
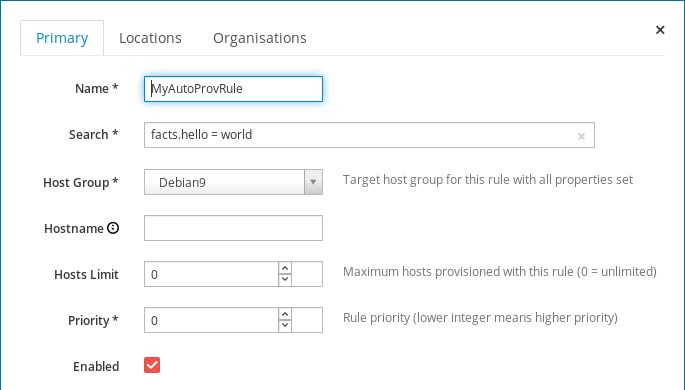
A Host Group must be specified as a template for the configuration of the hosts. To determine which hosts this rule should apply to, the appropriate criteria are specified in the Search Field. The host itself supplies the necessary database to orcharhino. Therefore you first write only
facts.hello = world
into the field.
- Hostname is left blank. This way the Discovery Plugin itself decides which hostname it assigns.
- Hosts Limit is left at 0. This disables the limit. A value greater than zero would mean that only a certain number of hosts can be rolled out using this rule.
- Priority is not required yet. This value would define the preference of the rule if the search term of different rules would fit on the same hosts (the smaller the value the higher the priority).
- Enabled Set check mark, because this rule should also be used.
- Locations and Organizations are set as usual.
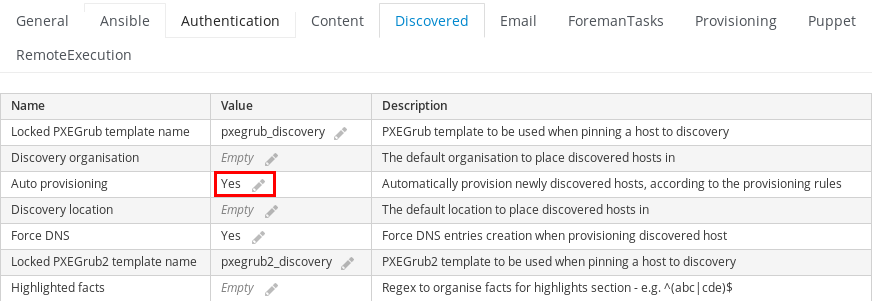
It is also important that the fully automatic rolling out of hosts is activated in the configuration of the Discovery-Plugin. To do so, go to Settings in the “Administer” menu, select the Discovered tab and set the Auto Provisioning value to Yes.
The basic configuration is now complete.
3. host provisioning
The host on which the new rule is to be rolled out now boots from the network. Next, select the Foreman Discovery Image from the boot menu. If the host is not served by the DHCP of the orcharhino, the host can also be booted via ISO image. This can be found here: http://downloads.theforeman.org/discovery/releases/latest/. This is a hybrid ISO image. This can also be installed on bootable USB sticks.
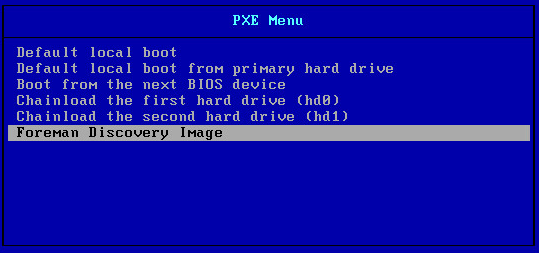
If the boot menu appears but not the entry for the Foreman Discovery Image, it helps to click on the Build PXE Default button in orcharhino under Hosts -> Provisioning Templates. This creates the boot menu entries again.
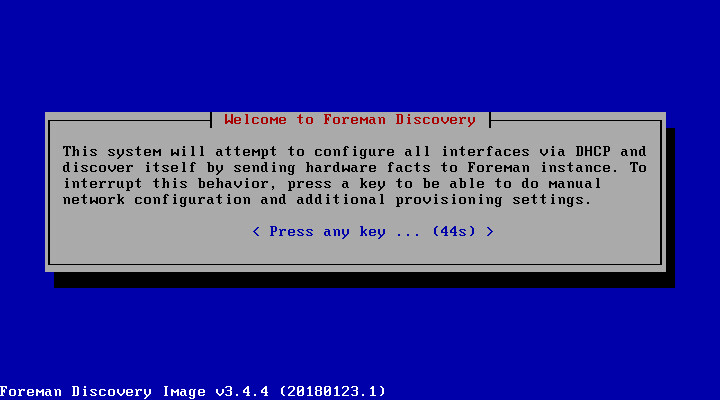
If the Discovery-Image is booted, you have the choice in the first display. If you do nothing, everything runs automatically and the host logs on to orcharhino with its data.
If any key is pressed before the countdown starts, the different values are requested. This requires the Discovery-Image to log in to orcharhino.
The IP configuration is left on DHCP. Also nothing changes at the network interface. For hosts with several network interfaces it may make sense to intervene here.
Now you have the possibility to change the URL of the orcharhino – if you prefer to use anorcharhino proxy or another orcharhino.
The Custom facts form, which comes next, is particularly important for this described use case. Because here we can define our own facts about the system. In this case, theDiscovery Rule was specified that the rule should apply if
facts.hello = world
is.
For the rule to be applicable to this host, the fact “hello”with the value “world” must be defined on this page.
Now the data collection is complete and the host sends the data to the orcharhino. The following display summarizes everything again and normally you could do some actions or view logs or all facts that were sent to the orcharhino. However, since Auto Provision is enabled, the host will automatically reboot and begin the installation. Now the first host is rolled out fully automatically.
4. the subtleties
Hostname
The new host is now called macXXXXXXXXXXXX (where XXXXXXXXXXXX is the MAC address of the host) – that’s fine, but there are certainly nicer names.
Fortunately this can be adapted. If you just want to use a different prefix, you can simply change the setting Hostname prefix in the Discovered tab of the global settings in orcharhino.
If you want it even nicer you can set the field Hostname for the Discovery Rule. Of course it makes little sense to assign a fixed value here. Therefore you can specify a template. This must be specified in the embedded Ruby Notation. Here are a few examples:
-
host- =>creates hostnames starting with host followed by a 3-digit random number. The trick is that .ljust(3, ‘0’) ensures that the number always has 3 digits. If the generated number is 4, the hostname host004 is generated.
-
host- =>appends the fact uniqueid to the hostname. Here you can also use the facts that were previously defined on the host itself (e.g. the hello fact). A list of all facts can be found on the host when the Discovery Image has successfully booted and the host has successfully logged on to orcharhino. Of course no Auto Provisioning rule must have been fitted, otherwise the host will immediately reboot and roll out. Alternatively the list is also displayed when you click on a found host in orcharhino at Discovered hosts.
-
-- =>has two parts. The first one uses the name of the Hostgroup; in the concrete example this would be Debian9. Of course you should set the Hostgroup name accordingly. Special care must be taken not to use characters that are not allowed in host names (e.g. ., _). Real professionals can dynamically remove the illegal characters using Ruby methods of theString-class (e.g. with gsub()). For example, this rule could create the following hostname: Debian9-042. The second of these is shown in the example above.
Search Filter
The creation of a filter string is not very complex, so the input field automatically makes suggestions. In addition to the facts already mentioned, the facts. there are also some default values, like the number of CPUs on the host (cpu_count) or the size of the main memory in megabytes (memory).
The comparison operators are mostly as usual:
- = (!=) checks for (in)equality
- =) checks if the left value is greater (greater or equal) to the right value
- ^: This operator checks if the left value exists in a list on the right side.
Example:-
cpu_count ^ (2,4,6,8) - applies if the host has 2, 4, 6 or 8 CPUs
-
- !^ checks if the left value is not present in a list on the right side.
Using the words and, or and not the expressions can be connected logically. For example, if you are looking for all hosts with a maximum of 2 CPUs and less than 2GB main memory that do not have 2 hard disks, the following query appears:
cpu_count <= 2 and memory <2048 and not disk_count = 2
With brackets the search filters can be grouped optically and logically better. For example you insert a not at the beginning and use the brackets to mark the scope, if you want to invert the query:
not(cpu_count <= 2 and memory <2048 and not disk_count = 2)
Customize Discovery-Image
The discovery image is based on CentOS 7 and should be sufficient for most cases. It can happen that the discovery image just doesn’t want to boot because, for example, one of the kernel modules is cross-booting. It can be helpful to adjust the kernel command line. Suppose you want to prevent a certain kernel module from being loaded (e.g. pcspkr). Then you would insert a blacklist. For this you append the kernel parameters as follows:
modprobe.blacklist=pcspkr.
This would prevent the pcspkr module from being included by the kernel.
The kernel command line can be easily customized at network boot by selecting the Foreman Discovery Image and then pressing [TAB]. This way the default values are displayed and can be easily edited before starting the image with [Return].
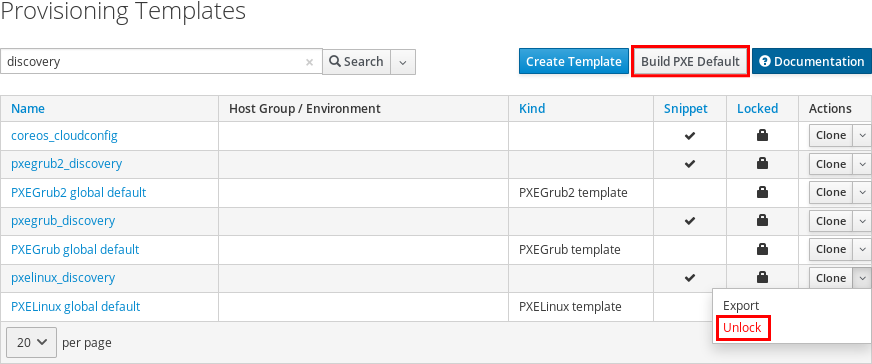
It is possible to change the kernel parameters of the image permanently. For the ISO image it is best to use the Discovery Remaster Script. When booting over the network the adjustment is a bit more difficult, because you have to edit the provided templates. First you search on the Provisioning Template page for templates that end in ‘discovery’. Among the results are the pxelinux_discovery snippet, which is the right one in most cases, and the pxegrub2_discovery, which is used for UEFI bios. In these snippets the kernel command line is defined. However, since these are supplied by orcharhino you should be careful: Changes can be overwritten during an update. To edit the snippets you must first unlock them. Once you have finished editing, it is essential to click on Build PXE Default on the Provisioning Template page. Only then are the changes available in the network boot loader.
Related literature